Sunday 30 August 2015

Mo's Challenge #254 something tasty

Here is my idea for the challenge #254 Something tasty. I used the Mo Mannings digital image Cupcake Mouse that was on special a few days ago. He was alot of fun to colour in, and will certainly use him again! 
I love his outfit and it made me think of vintage circus so I choose my colours and patterns thereafter.
Thanks for stopping by :)

Sunday 9 August 2015

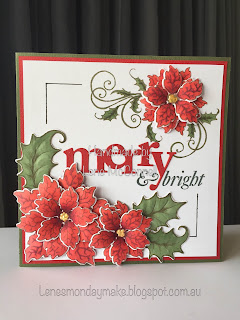
Christmas card for my Australian family and friends


Poinsettia dies and stamp: Heartfelt Creations Sparkling Poinsettia set
Coloured with Copics: R24 - R39 - R59 - G94 - G99
Centre done with Ranger Liquid Pearls Buttercup
Merry die & bright stamp from Papertrey Ink 

This is my first result of using the new Sparkling Poinsettia set from Heartfelt Creations. I was stuck on christmas cards to make for my Australian family and friends, as it felt a bit awkward to make them winter and snow themed cards when christmas is in summer time! But this stamp and die set is just absolutely beautiful, and something I will definitely use every year and even to make things for the home as well (planning to make a tissue box and decorate it with this as well). And poinsettias are great for summer or winter christmas.


I have already made 3 of the same, and I might just make them all the same this year as I still have other cards I need to finish before the big due date.

Loved colouring them in and assembly them (and creating the card of course), have already ordered another flower set from the same company. 

Saturday 8 August 2015

How easy and awesome is the MISTI (Most Incredible Stamp Tool Invented) - A quick review

I just wanted to make a little post about one of my recent purchases, the M.I.S.T.I (Most Incredible Stamp Tool Invented). Now I do not have much experience in stamping, but it does indeed seem like an incredible stamp tool!

I am still making christmas cards, and I took a few photos when I was doing the layout of one, while using the MISTI.


Picture 1.
This is the layout I want. Nothing is glued down. The paper is aligned with the corner, and held down with the help of two magnets so it wont move. (Though don't pull up the lid to fast with the stamp attached to it as it can get a tad stuck on the paper and pull the paper with it).
Make sure the stamp is perfectly clean so you wont smudge the paper while searching for the right position.


Picture 2.I have put down the stamp where I want it according to the other embellishments, and with the grid checked that it is perfectly aligned and straight.


Picture 3.
I remove all the embellishments so that I don't squeeze them when stamping, and I press down to attach the stamp to the MISTI lid, removing the merry die cut after so I don't move the stamp.

 Picture 4. 
I have brought the stamp up, inked it, and stamped the sentiment.

 Picture 5.
And this is how it looks. Nothing is still not glued down, but my next post will show the final card and details of what I have used :)
1st great thing about this tool is that it is so easy to plan the layout making sure everything is at the right place before stamping, and that the stamp is aligned and straight.
2nd great thing about it is that if ever your stamp didn't ink properly, you can reink it and put it down at the exact same spot. Try that without this tool!
3rd good thing is that if you make several of the same card, you can place a new paper and stamp it the same way at the same spot every time! Great for invitations, thank you cards etc.

It saves you time, and frustration of not getting it right, and it saves supplies as it just comes out perfect and no need to toss ruined paper :)
It is an investment, but I feel it was money well spent! 

Sunday 26 July 2015

Copic combo blending sheet!


I have made my own little blending sheet for different colour combos. Great to have to look at for a quick overview of different combinations!
Excuse my colouring, I did it a bit quickly, and a couple overfilled pens made it a bit messy! Anyways, I was looking around for a simple sheet where I could use however many colours I wanted and write the number neatly right next to it. Couldnt find it so made one, and this is the result :)
It is available for download under here, in .pdf format.

Summer party girl Challenge #253


Image: Mo Manning Party Girl
Diamondessence by Spellbinders
Celebrate and Cheers from Papertrey Ink
Wine glasses from My Favourite Things


I finished another card today! I ve gone a bit out of my comfort zone when it comes to colours, but I had a challenge in mind, Mo's Digital Challenge #253, and this is the result! I do love the colours tho, it makes me happy and suits today as it s a warmer winter day here down under!

Baby girl on blankie

Image by Mo Manning Baby on blankie
Luscious labels 1 by Spellbinders
Baby stamp by Stampin' Up
Roses from Iamroses.com

This time I have a baby girl card, a new image from Mo Manning Baby on blankie, so adorable! I havent made this for anyone in particular, all my friends are expecting boys, so i just wanted to make a girly one. I just love pink.
And this is my first card where I have added roses, I think it looks quite cute, definitely adds something extra to the card! I have used two sizes, 1.5cm and 1cm.

I should get better on writing down the copic colours I use, I promise I will begin with that from now on!
Thanks for looking!

Thursday 16 July 2015

Jesen #2


Image: Mo's Digital Pencil Jesen
Happy: Simon Says Stamp!
birthday: Papertrey Ink
Oval Lacey Scallop by Spellbinders

Here is my 2nd card with the Jesen! Love colouring this little one :)